The prevalence of back pain in our society has reached epidemic proportions. Research shows that 80 percent of people will experience back pain at least once in their lives, impacting their ability to engage in activities they love and enjoy life to its fullest (American Chiropractic Association, 2013). Fitness professionals properly trained in corrective exercise are perfectly positioned to assist these people in getting out of pain. In this two-part series on identifying and alleviating common causes of back pain, you will learn a number of simple musculoskeletal assessments and effective corrective exercises to help clients feel and function better. This first article explores some possible lower-body causes of back pain and offers corrective exercise solutions you can integrate easily into your personal training business.
A Quick Look at How the Lower Body Should Work
Understanding what should happen in the body when it moves correctly is the first step in helping clients overcome back pain. If you know how the parts of the lower body function during common fitness activities such as walking, running and lunging, you can assess for dysfunction in these areas and design corrective exercise programs to address any imbalances you find.
When you are walking or running, you must transfer weight forward and from side to side as you step forward with alternating feet. Part of this weight transfer is possible because the feet have the ability to roll inward and toward each other (i.e., pronate). When the foot pronates, the ankle rolls in with it, which in turn helps rotate the lower leg, knee and thigh toward the midline of the body. The femur (i.e., thigh bone), which fits into the pelvis to form the hip socket, should also rotate inward in time with the lower leg, foot and ankle (Kendall et al., 2005).
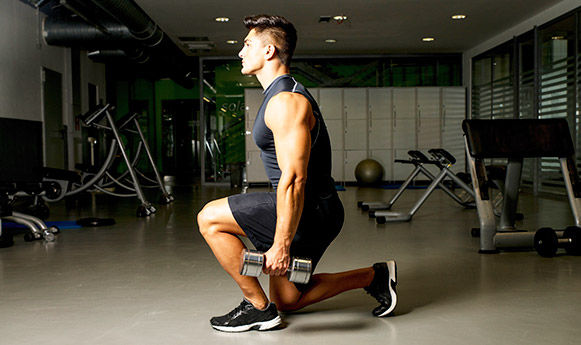
When you are lunging forward you are also transferring weight into one of your feet. As with walking and running, this transfer of weight forward and in to the foot should be accompanied by ankle, leg, knee and hip motion forward and toward the midline of the body.
How Foot, Ankle and Hip Dysfunction Can Lead to Lower-back Pain
Let’s take a look at how dysfunction in any one of these areas of the lower body can lead to back pain. We’ll start with the feet and ankles. As you now know, pronation of the foot enables the ankle, lower leg and upper leg to roll inward. However, due to a whole host of possible causes like muscle weakness, musculoskeletal imbalances, past injuries, lifestyle activities, choice of footwear and the environment, most people overpronate (i.e., they collapse too much in their foot and ankle), and have done so for most of their lives (American Council on Exercise, 2010). Over time, overpronation leads to wear and tear of the joint structures of this area, which in turn leads to immobility of the feet and ankles. If these structures are unable to move correctly, they cannot transfer weight and/or dissipate impact forces correctly. Hence, other structures in the lower kinetic chain, like the hips, must compensate to get the job done.
However, the hips may not be able to help out effectively. Extended periods of sitting, whether at a computer, driving, eating, playing video games and/or watching TV, place the hip sockets in a constantly flexed position, which can also lead to movement restrictions in the hips. (Overdoing athletic movements that require only one or two ranges of motion for the hips, like bike riding or running, can also lead to myofascial restrictions and subsequent hip immobility.) If all these lower-body structures (i.e., feet, ankles and hips) lack the mobility to turn inward toward the midline of the body, the job of transferring the weight of the body forward when walking, running and/or lunging is displaced further up the kinetic chain to the pelvis and lower back.
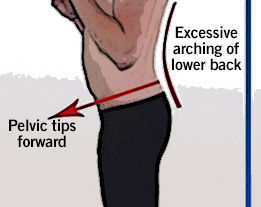
The joints of the lower back are less mobile by design than the feet, ankles and hips. The lower part of the back contains a forward curvature, which naturally causes the front of the pelvis to tilt down approximately 10°. When the structures of the lower body are not working correctly and the pelvis and lower back must compensate, it results in a pair of interlinked deviations called an anterior pelvic tilt and excessive lumbar lordosis (Price and Bratcher, 2010). An anterior pelvic tilt is a tipping down and forward of the pelvis and excessive lumbar lordosis is an overarching of the lower back (see Figure 1). These common deviations place added stress on the structures of the lower back and surrounding muscles, which causes fatigue over time and eventually leads to pain.
Mobility Assessments for the Lower Body
Assessing your client’s feet, ankles and hips enables you to evaluate the mobility of these structures to see if they are doing their part to ensure the lower back and pelvis are not overworked. Following are assessments for both of these areas.
Toes-out Torso Rotations
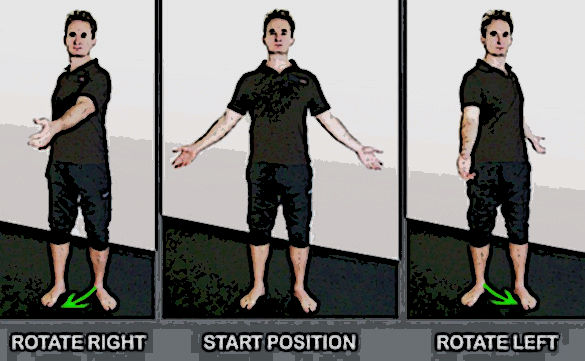
This assessment evaluates the ability of the foot and ankle to roll inward toward the midline of the body. It can also be used to help promote mobility of the foot and ankle as a warm-up exercise once your client has addressed any soft tissue structures that may be restricting his or her movement. (Note: The exercise portion of this article contains techniques for rejuvenating the soft tissue structures of the foot and ankle.)
How to Perform:
Instruct your client to stand with feet slightly wider than hip-width apart and the toes turned out to about 45°. Have the client stand upright with both arms lifted away from the sides of the body. Next, coach the client to swing both arms to the right as he or she rotates the body to the right. Let the client know it is okay if the left knee bends slightly as he or she turns. Cue the client in on the sensation he or she is feeling in the left ankle while rotating to the right. Ideally, the left ankle should roll in easily to the right (i.e., collapse toward the midline of their body) as the arms and torso rotate.
Then have the client swing both arms to his or her left side and rotate to the left (allowing the right knee to bend slightly). Finally, instruct the client to rotate back and forth from left to right to get a feeling for how the feet and ankles move toward the midline of the body as he or she rotates. Ask the client to evaluate if there is any difference in the movement ability between the two ankles and make a mental note of what he or she feels. If there is no obvious visual difference in mobility observed by you between the two sides, use your client’s feedback on what he or she feels to assist with an accurate assessment.
Additional Considerations:
1. This assessment is best performed in bare feet on a non-slip surface such as a rubber mat.
2. If your client’s ankle(s) makes a “popping” noise while performing this assessment, this is perfectly normal. It means the ankle joint is naturally adjusting and he or she will have more mobility as a result.
3. If your client’s knee(s) feel uncomfortable when performing this movement, instruct him or her to turn the feet out less, which will take stress off the knees.
Lying Hip Rotation
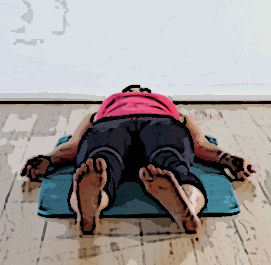
This assessment evaluates the ability of the hips to move inward toward the midline of the body. Instruct your client to lie on the floor on a mat. Have the client spread his or her legs about 18- to 24-inches apart and try to turn both of the legs inward so the feet move toward each other. Look to see if one leg cannot turn as far in as the other leg. As with the previous assessment, if you do not see an obvious problem, ask your client to tell you if he or she feels a difference between the sides and/or if one side feels more difficult to turn in. Both legs should be able to turn in about 30°. In the example below, the client has almost an acceptable range of motion for her left leg, while her right leg is severely lacking the mobility to rotate inward.
From Assessment to Exercise
There are many corrective exercises you can utilize with clients to improve foot, ankle and hip mobility. However, the most important exercise objective is to release tension from the muscles that help control foot, ankle and hip function with various self-myofascial release techniques (Rolf, 1989). Once the tissues have released you can then move onto more dynamic exercises, like stretching. Below are six simple exercises that can greatly improve function of the lower-body structures to help prevent the lower back from having to overcompensate for immobility in the feet, ankles and hips.
Performing these exercises on a regular basis will help alleviate pain in your client’s lower back (as well as in the feet, ankles, knees and hips).
Corrective Exercises for the Feet and Ankles
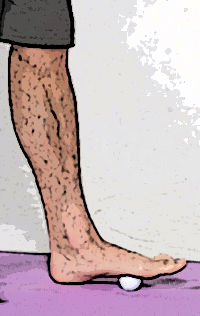
Golf Ball Roll
Overpronation leads to wear and tear of the plantar fascia and degeneration of other structures on the underside of the foot. Over time this can lead to immobility of the foot. This self-myofascial massage technique can help regenerate the tissue on the underside of the feet, allowing the structures to be more mobile.
Instruct your client to roll a golf ball at least once daily on the underside of each foot for 30 to 60 seconds, concentrating on any sore spots they find.
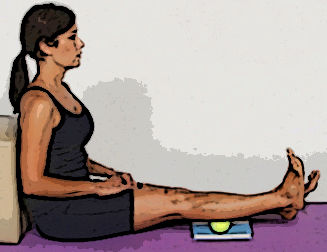
Calf Massage
Musculoskeletal deviations of the feet and ankles can cause tightness and restrictions in the calf muscles. Using a tennis ball to self-massage the calves is a great way to help rejuvenate and restore health to these muscles so the ankle and foot can move more effectively. This exercise can improve foot and ankle function, which will help take stress off the structures of the lower back.
Instruct your client to sit back against a wall or couch and place a tennis ball (or harder ball like a baseball if more pressure is needed) under the calf. Have the client raise the ball up slightly by placing it on top of a book to take pressure off the knee, if necessary. Instruct the client to massage each sore spot he or she finds for 20 to 30 seconds and then move the ball to another spot. Do both legs.
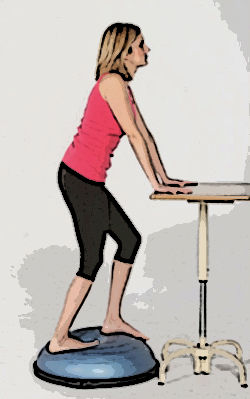
Calf Stretch on a BOSU
There are many muscles that originate on the lower leg and wrap around the ankle before inserting on the underside of the foot (Gray, 1985). When these muscles are tight they can restrict mobility of the ankle and foot. (Note: Use the “Golf Ball Roll” and “Calf Massage” exercises outlined above to help warm up the muscles before doing this stretch.)
Instruct your client to stand in a split stance on top of a BOSU Balance Trainer, with the hands on top of a table or against the wall to assist with balance. Coach the client to put the majority of his or her weight into the back foot, straighten the back leg, supinate the foot (i.e., arch raised and foot rolled out) and push downward with the heel. Then have the client gently bend the knee of the leg that is back, pronate the foot (i.e., roll their foot in) and then return to the starting position. As the leg goes from straight to bent, the foot, ankle and knee should roll in toward the midline of the body. Perform this exercise daily for about six to eight repetitions on each side.
Corrective Exercises for the Hips
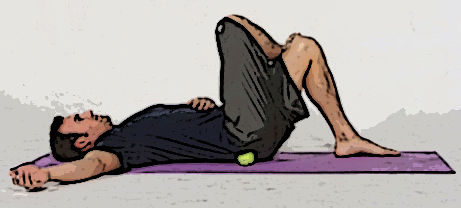
Tennis Ball Under the Glutes
The gluteus maximus muscle helps control rotation of the leg and the hip socket (Golding and Golding, 2003). Using a tennis ball to release and rejuvenate this muscle (and the other smaller hip rotators muscles of this area) will enable the leg to rotate more freely in the hip socket.
Instruct your client to lie on the floor with the knees bent; place a tennis ball under one side of the glutes. Coach the client to move around on the tennis ball to find a sore spot, stay there for 10 to 20 seconds as the tension releases, and then move to a new spot. Perform at least once a day for about two to three minutes on each side.

Tennis Ball on Hip Flexors
The hip flexor muscles originate on the lumbar spine, cross the pelvis and attach to the top of the leg. They also help control rotation of the leg and hip socket. Performing the following massage technique with a tennis ball is an effective way to increase hip mobility.
Instruct your client to lie face down and place a tennis ball under the front of the hip/leg and find a sore spot. Coach the client to maintain pressure on the sore spot for 10 to 20 seconds until the sensation lessens, and then move the ball up and onto the abdominal region, releasing sore spots along the way from the top of the hip to just beside the bellybutton. (Note: Do not place the tennis ball on the sensitive areas just to the side of the pubic bone, where the leg meets the groin.) Perform this exercise once per day for about one to two minutes on each side.
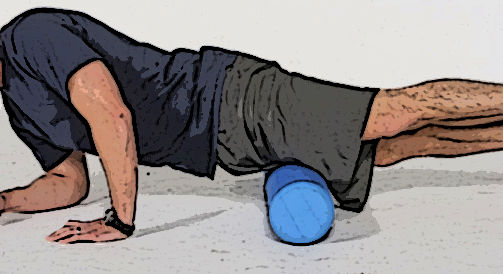
Foam Roller on Side and Front of Leg
There are two other important structures on the upper leg that help control rotation of the hip and leg. The iliotibial band connects the gluteal muscles to the lower leg, and the rectus femoris, which is a quadriceps muscle, originates on the pelvis and connects to the kneecap. These structures must be healthy and flexible to enable the hip, knee and lower leg to work correctly.
Instruct your client to lie over a foam roller placed perpendicular to the upper leg. Have the client roll his or her body to the side so the front and outside of the upper leg makes contact with the roller. Coach the client to roll on any sore spots he or she finds.
Do each leg for approximately one to two minutes every day. (Note: If the pressure of the foam roller is too much for your client, you can regress this exercise by placing a tennis ball under the side and front of the leg while he or she is lying down.)
Restrictions in the muscles that enable the feet, ankles and hips to function correctly directly affect the amount of stress experienced by the lower back. By utilizing the simple assessments outlined in this article and applying the effective corrective exercise strategies provided, you can help your clients perform better and experience substantially less lower-back pain.
Part two of this series will focus on possible upper-body causes of back pain and offer corrective exercise solutions you can integrate easily into your work with clients.
References
American Chiropractic Association (2013). Global Burden of Diseases, Injuries and Risk Factors Study.
American Council on Exercise (2010). ACE Personal Trainer Manual (Fourth Edition). San Diego, Calif.: American Council on Exercise.
Golding, L.A. and Golding, S.M. (2003). Fitness Professional’s Guide to Musculoskeletal Anatomy and Human Movement. Monterey, Calif.: Healthy Learning.
Gray, H. (1995). Gray’s Anatomy. New York: Barnes and Noble Books.
Kendall, F.P. et al. (2005). Muscles Testing and Function with Posture and Pain (5th ed.). Baltimore, Md.: Lippincott Williams & Wilkins.
Price, J. and Bratcher, M. (2010). The BioMechanics Method Corrective Exercise Educational Program. The BioMechanics Press.
Rolf, I.P. (1989). Rolfing: Reestablishing the Natural Alignment and Structural Integration of the Human Body for Vitality and Well-Being (revised edition). Rochester, Vt: Healing Arts Press.

 by
by 