The stability ball was originally used as a physical therapy aid for postural re-education and orthopedic rehabilitation. Today, you can find these large, air-filled balls in a variety of sizes in just about any fitness setting. They are used by exercise professionals in personal training and group fitness as a way to add interest and fun to core and stability-based workouts. Although stability-ball exercises appear to activate about as much deep abdominal muscle as similar movements on the floor without a ball (Martuscello et al., 2013), they can add value to a training session when you’re looking for variety and whole-body integration while working the core.
The following workout circuit on a stability ball adds a new twist to your ab routine. Perform 10 to 15 repetitions of each exercise, and do the circuit more than once if you want more challenge. Choose a ball size that allows you to sit comfortably on top with your feet flat on the floor, thighs parallel to the floor, and both hips and knees bent at 90 degrees. Keep in mind that to work the entire mid-section, it’s important to challenge the torso from various directions. That is, there is more to a balanced core program than just performing crunches or sit-ups. The following routine features movements that address the entire functionality of the trunk muscles—flexion, extension, side bending and rotation.
Note: Only attempt this workout if you have had previous experience using a stability ball and feel confident moving on the ball in all of the positions shown.
1. Ab Crunch With Diagonal Press

Grasp one, small weight (e.g., a 5-, 8- or 10-pound dumbbell, plate weight or medicine ball) with both hands. Sit on top of the ball and walk the feet forward until your back is supported by the ball. Start with the weight on the chest. As you come up into an ab crunch, straighten the elbows and push the weight at a diagonal away from you toward the ceiling. As you return to the start position, bend the elbows and bring the weight back down to the chest.
2. Back Extension Over Ball
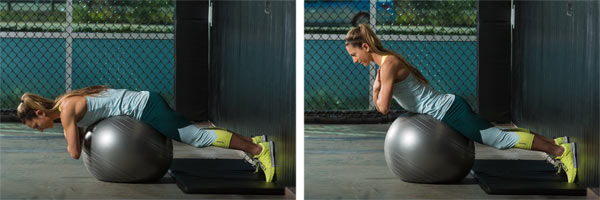
On an exercise mat, kneel with your back to a wall and position your feet against the wall. Lean over the ball and position it underneath your abdomen. Slowly straighten your knees as you lean over the ball, which will effectively put the ball under your hips. You should be leaning over the ball with the upper half of your body unsupported, while your hips and thighs are supported by the ball and your feet are support by the wall. Keep your abdominals contracted and your glutes tight and cross your arms over your chest. Slowly lower and lift your torso to work the trunk extensor muscles.
3. Pike on Ball
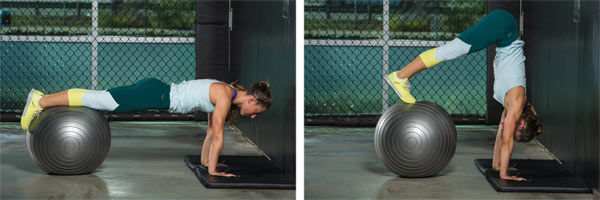
Adopt a plank position with your hands on the floor aligned underneath the shoulders and your thighs on top of the ball. Position yourself with your head toward a wall that is strong enough to hold your weight in case you lose your balance and need back support from the wall (this will prevent you from rolling forward into a summersault). Slowly roll the ball toward your body as you lift the hips upward into a pike position. If you feel comfortable in a handstand, align the hips above the head in the end position so that you are essentially upside down. However, if you are unsure of your ability, only bring the hips upward as high as you feel confident and stable. Slowly roll the ball back out to the start position.
4. Supine Twist on Ball
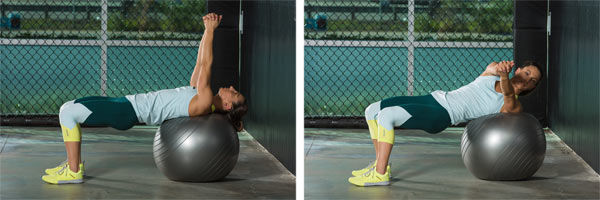
Sit on top of the ball and walk the feet forward until your back and head are supported by the ball. Clasp your hands together and straighten your arms up toward the ceiling. Keep the feet hip-width apart and the head, neck and hips in a straight line from your head to your knees. Slowly rotate your upper trunk to one side and then the other while keeping the pelvis in place.
5. Kneeling Plank Roll-out
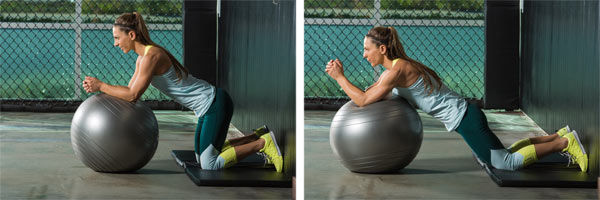
On an exercise mat, kneel in front of the ball with your knees about 12 inches from the ball and lean on your forearms so that your shoulders are directly above your elbows. Gently contract the abdominals and slowly straighten your arms as you push down into the ball to move it forward. Roll out the ball as far forward as you can, but stop if your hips start to sag. Return to the starting position, keeping the abdominals engaged throughout the exercise.
6. Side-lying Leg Lift
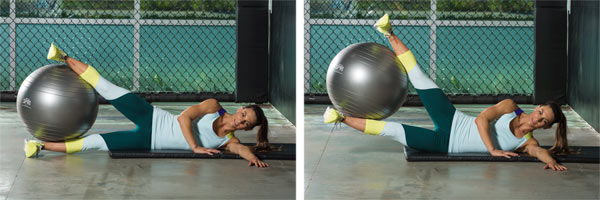
On an exercise mat, lie on one side with your bottom arm outstretched in front of your chest and your palm facing the floor for support. Trap the ball between your feet and shins. Slowly lift the bottom leg off of the floor while keeping your torso stable and on the floor. Return to the start position with the leg on the floor. Complete all of the repetitions on one side before moving on to the next.
Reference
Martuscello, J.M., Nuzzo, J.L., Ashley, C.D., Campbell, B.I., Orriola, J.J., & Mayer, J.M. (2013). Systematic review of core muscle activity during physical fitness exercises. Journal of Strength & Conditioning Research, 27, 6, 1684–98. doi: 10.1519/JSC.0b013e318291b8da. Review.
 by
by 